Want to remove ads? Become a MK3OC Club Member today!

Arctic Project (Take 2)

Washer to the rescue, meant the plug didn't foul the bolt...

IMG_5324.jpeg

Sand in photo is from slight coolant/fuel spillage as didn't de-pressurise the system before disassembly.... only realised as I was about to take the injectors out.... dope

test fitted things to work out what things I needed to try and complete the project.
IMG_5332.jpeg


again another angle, after posting on the x16xe/x18xe tuning page on Facebook, many recommend removing the bits for the coolant in the throttle body, I then used one to form a connection between the two pipes.
IMG_5335.jpeg


later found from reading corsa sport guide that I needed to drill the throttle body so that the screws would just drop straight in, fairly easy to do.IMG_5347.jpeg

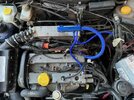
and all back together... IMG_5349.jpeg

I just need to fill with coolant, tidy the hoses and wiring up (May over the winter re-do the wiring and hide it away). for now will butcher the original air pipe onto the original airbox just to get it running and go from there...

hopefully it starts okay :biggrin:
 
Got it started last Night... but was revving to about 4.5K so need to make a gasket for the throttle body. and find any other air leaks... but at least it started :biggrin:
 
Positive Update!

So came to the conclusion there was an air leak somewhere, After taking the throttle body off of the Powerbox my dad identified that the flange to blank the bit for the EGR? I think wasn't completely straight nor flat, and that was definitely letting air into it. After looking at the parts that came off of the car, I found the gasket, and whilst I have ordered some off of AutoDoc I had a go at making my own, with the addition of some gasket seal for all the gaskets, As the Mating side of the lower inlet who ever has had it before me has hashed it up a bit so at least I could eliminate all leaks.


Traced the Original on the Gasket paper which I got from amazon.
IMG_5652.jpg

Cut out, now as I can't get a bolt in top left I have chose to use the gasket to blank that bit off. I knew Cutting shapes at school would come in use at some point :lol:
IMG_5653.jpg


Test fit for everything, made sure everything was secure, filled the coolant up and got it started, Started in about 5 seconds, and let it run for a few minutes to let all the sensors and the ECU adjust to the changes.
IMG_5658.jpg

Used the original Air filter for now, Means I could get it running etc, Cable ties instead of the clamps for now, Wanting something blue and custom for the intake. The wiring NEEDS! tidying and some bits extending and protecting too.
IMG_5663.jpg

Took it out for a drive, let it warm up etc, and then was presented with an engine management light....

IMG_5664.jpg

Out the Opcom came and as I had feared/thought it was to do with the EGR, Which I didn't blank but all the ports to it are blanked I think, so going to look into properly blanking it, although once the code was cleared I drove it for over 25 miles today and it hasn't come back on.
IMG_5667.jpg

Took it out for a drive this evening, went to a local car show and drove spot on, no issues and no warning lights.
IMG_5703.JPG

Bought myself one of these, to try and tidy up the vacuum hoses, and ordered some blue hoses to go with, I hope to also do something with the brake servo hose too when I work out what fitting it needs.
s-l1600-27.jpg

Happy Days!
 
Mega work when you sell it let me know lol
 
Picked up the Spoiler after having it sprayed....

IMG_6022.jpeg


Quick Before shot
IMG_6026.jpeg


Gave a good opportunity to clean the paintwork up behind the original one, and got some rust remover on the little patches and touched in with the touch up pen.
IMG_6027.jpeg


Rust remover doing its thing...
IMG_6029.jpeg
In the middle of removing the bracket at the ends, as I followed the guide on the forum and used the velcro.... Hate drilling holes in body work so this was a good save :D

IMG_6031.jpeg

Got it all lined up and made sure everything was clean and ready to go
IMG_6042.jpeg

Finished Result... Loads better and colour coded looks the part
IMG_6048.jpeg
 
Got a few things ordered over the past few days, I got some Boot light fittings to try and make them into footwell lights in the kick panels at the bottoms of the A Pillars. Think Gareth has done that and its something he mentioned a while back that seemed a good OEM+ mod.

Won some Tinted Repeater indicators on EvilBay so they should be coming this week, as well as some struts for the bonnet.

This evening I got on with fitting the vacuum manifold, I bought all the coloured hoses and the jubilee clips from Stoney Racing, Really good stuff, reasonable and quick delivery, LEAFLET10 gets you 10% off as well :biggrin:


So the before Image.....
IMG_6183.jpeg


Bought this M16 Fitting to use the port out of the manifold to a normal hose fitting to go to the vacuum manifold, however the thread didn't go all the way and it became loose and not tight, so I decided to try work with the fitting I already had on.
IMG_6187.jpeg

The Reinforced Hose fits nice and snug over the fitting that comes off the original manifold. I will secure with a Jubilee clip for security.
IMG_6189.jpeg

I went about removing the vacuum servo pipe and tried to get the hose off the fitting, this didn't work well and I really didn't want to risk breaking the plastic bit and making the car underivable until I found a replacement. I decided to cut the original pipe and jubilee the new hose to it.
IMG_6198.jpeg


I found I could just use this one piece below to connect between the servo and the vacuum manifold, make it look a lot neater as well.
IMG_6200.jpeg
All the pipes attached, except the one that comes off the oneway valve on the brake servo, I just had to attach that to the end port on the manifold.
IMG_6202.jpeg

I've looped the two unused vacuum ports back on themselves, as I had no need for them now.
IMG_6204.jpeg


All Done, Just need to order the longer bolts to fit the vacuum manifold to the inlet manifold, I need blue tie wraps I think lol
IMG_6206.jpeg

Hopefully new rear calibers and brake on at the weekend :biggrin:
 

Attachments

  • IMG_6193.jpeg
    IMG_6193.jpeg
    67.6 KB · Views: 2
New bolts arrived to mount the Vacuum Manifold...

Got 100mm and 110mm
IMG_6271.jpeg

ended up just using the 100mm but the 110mm will come in use at some point im sure...

Wasn't too happy on the bit of movement in the fittings on the vacuum block so I used some PTFE tape on them, should give a decent seal.
IMG_6272.jpeg

To avoid any issues with the two manifolds together I used some of my gasket paste and the gasket paper to make a gasket for the vacuum block.
IMG_6273.jpeg

Test Fit....
IMG_6274.jpeg

IMG_6276.jpeg


also got a little too excited and carried away with my nano polisher and the top cover, will finish at some point, but nice to see what can be achieved.
IMG_6281.jpeg


My dad had suggested getting the Allen cup screws for the top bit as well, so measured them, M6 and will order some from the same place I got the others.
IMG_6284.jpeg


Finished for the night, Someone pointed out that I had connected the rocker cover breather to the vacuum block and shouldn't be connected there so ive disconnect that until I find a way of making an adjustment to the inlet bit before the throttle body.
IMG_6285.jpeg
 

Attachments

  • IMG_6277.jpeg
    IMG_6277.jpeg
    66.1 KB · Views: 1
No harm in leaving it the cam case pipe off for time being. We will look at it tomorrow :)
 
Got the new Side repeater lights the other day, quick before and after...

IMG_6308.jpeg


After
IMG_6349.jpeg

I need to get some orange bulbs for them.


Started fitting my footwell lights. 4.5 cm by 1 inch is the hole in the boot, so used that as a template
IMG_6343.jpeg


Test fit
IMG_6345.jpeg

Nicely finished off, will put some halogen coloured LEDS
IMG_6347.jpeg
 
These Turned up today, so fitted those to the Dark Repeaters.

IMG_6469.jpeg

Also got a front & Rear Dash Cam with amazon prime days..... will fit that before VBOA.

got on with the passenger footwell light... had to change the position to the drivers side due to having the shelf under the glove box.

IMG_6477.jpeg

whilst I had the glove box out I remembered the Air Con pipe for the glove box has been broken for a while... so some left over tube came in good use for that, as well as the old brake servo pipe.

IMG_6479.jpeg

IMG_6480.jpeg


Used the end of the old pipe to connect to the car side of things.
IMG_6481.jpeg

ready for glove box
IMG_6484.jpeg

and footwell light working on the passenger side.
IMG_6485.jpeg
 

Attachments

  • IMG_6478.jpeg
    IMG_6478.jpeg
    112 KB · Views: 0
Massive thanks to Gareth for his time and patience on Saturday, Despite the rain he plowed on with fitting the rear brakes to the Mk3, I had attempted to build the brakes up but was struggling on getting the springs to compress... later turned out why...
IMG_6362.jpeg

New pin was a fraction too short.


plowed on with the old pins but new springs. The brake shoes are just a generic one from Mtec
IMG_6363.jpeg

went with the Mtec grooved discs, will get some for the front when I decide what im going to do, did think of some before VBOA, but that would be pushing it a tad.
IMG_6364.jpeg

luckily I had two sets of calibers, and caliber rebuild kits as we ended up stripping all of them, and making the best of what we had, a lot of heat and some ugga Duggar later we have some split calibers.
IMG_6365.jpeg


before and after the rebuild kits.

IMG_6367.jpeg

before with the originals
IMG_6370.jpeg

after :biggrin:

IMG_6371.jpeg

IMG_6375.jpeg
 
would have taken me days to do this, but was good to see how its done for future, and how to make brake pipes.
IMG_6377.jpeg

Drove it home, and makes a big difference, obviously will bed them in, the calibers have EBC ultramax in them, Used them before on other cars and they work well.
IMG_6382.jpeg

I Now owe Gareth a lot of beer at VBOA
 
What did you do handbrake wise as you usually need other brackets
 
What did you do handbrake wise as you usually need other brackets
I supplied clegg with genuine spare set of brackets ages ago. :)
 
Got myself a Dash cam in the Prime sales....

Its a basic Nextbase but does front and rear...

Hate being able to see the camera etc so nicely hidden behind the rear view mirror
IMG_6492.jpeg

It's Still accessible to press the record incident button if needed.
IMG_6493.jpeg

Wanted to attache the rear camera to the rear boot lid, so managed to get the cable fed through the rubber hose between the body and the lid...
IMG_6496.jpeg

Ended up using a cable rod to get the cable through, They're fairly flexible which does help...
IMG_6500.jpeg

IMG_6504.jpeg

Cut a little groove in the plastic around the rear screen just to allow the cable to come through.
IMG_6505.jpeg

Currently on a piggyback fuse on an ignition live circuit.
 
Got myself to the local Oil merchant and gave their own brand oil a try, they've been making it for nearly 100 years....


£19.98 for 5 litres
IMG_6470.jpeg

IMG_6630.jpeg

What a **** to get off....
IMG_6633.jpeg

Wanted an oil change before VBOA, as I had forgotten the last time I've done one, and with the recent works I did wanted it to be running at its best. Did get some new spark plugs which I have yet to change.


Made a few adjustments to the handbrake and whilst it was on the stands I gave it a good snow foam....
IMG_6597.jpeg

Quick machine polish and go over with turtle wax canuba, I just ran out of time to do a full Autoglym job, but still comes up nicely.
IMG_6611.jpeg

IMG_6635.jpeg

Also received this in the post will do something with it in the next few weeks...

IMG_6698.jpeg

Planning on getting a boss fitted for the Air temp sensor but also to feed the crank case vent back into, like on the standard intake.
 
It got to VBOA Day, did a few last minute things on the morning, Namely wanted to duct the engine cables up a little, as was concerned with the engine temps of the long drive....

IMG_6715.jpeg

Filled the car with Esso Supreme 99+ and headed to Wetherby to meet with the others....

IMG_6721.jpeg

Back on the road.... Next stop VBOA... after a few hiccups....

didn't arrive till after 5:30pm
IMG_6726.jpeg

Bit of roadside maintenance, thankfully id had little confidence in some of my vacuum pipes so brought spare pipe and loads of jubilee clips...
IMG_6727.jpeg

Mine was spot on, engine management light came on now and again, but I know EGR is causing that, So that is on the list to sort after vboa, did over 400 miles on the tank, not too bad considering a lot of the driving was in traffic with the aircon on and a full boot of stuff.

Bit of a sunset after we arrived:
IMG_6739.jpeg

Bit more presentable... plus a MK3oc sticker on the sun strip too
JJCleggPhotography2023__DSF6826-HDR.jpeg
 

Users who are viewing this thread

Back
Top